Step by Step Tutorial: How to create an Instagram landing page on Squarespace | Savannah Wedding Photographer
Fridays on Instagram should be spent crafting fun #fridayintroductions posts, NOT panicking over Linktree suddenly being no longer an approved third-party bio link. But that’s exactly how this morning began, and while the issue magically resolved itself within a few hours, I immediately knew I didn’t want my bio link in third-party hands anymore.
So I reached out to my Virtual Assistant (Adrienna at Ava + The Bee) for a solution, and we decided that a dedicated link landing page on my own website was the way to go! It could function just like Linktree, but with so many more benefits and none of the risk.
And now I want to show you guys how she did it! So I asked Adrienna to put together a step by step Instagram bio link landing page tutorial for you guys, and I’ll turn it over to her now…
FROM ADRIENNA:
Third party apps with Instagram can be frustrating. Sometimes they don’t work, or the site is down, or one day they disappear completely, and all of your information is gone. Today, Linktree decided to stop working, causing a frenzy in the Instagram world. Gone were all of your links! Don’t you wish there was an easy alternative, that would not only be more reliable, but better for your SEO? There is!
Make an unlinked Instagram Landing Page! By creating a landing page right in your website, you can make sure your link always works. Squarespace makes is quick and easy to make a landing page, so follow our step by step tutorial below!
Some awesome benefits?
1. It helps you track visitors easier
Tracking how many people visit your Instagram, and how many click through to your website, can be hard to track. While Instagram has some analytics, it doesn’t give you enough data to see how effective your marketing strategy is. By creating an unlinked Instagram landing page, you can track your site visits via Google Analytics by seeing who clicked on your /Instagram page.
Being unlinked is key here! When your site is unlinked it can only be visited by those clicking the link from your Instagram. This allows you to see exactly how many people visit your site from Instagram, not just from browsing on your website.
2. Easier to update
You don’t have to change your link every time you post new content. You can keep the same link in your profile, and update the webpage as you add content. And with our tutorial below, you will see step-by-step on how easy it is to add content.
3. You can brand it
Other link options don’t allow detailed customizations (unless you paid), meaning you had to pick from pre-selected colors and fonts. By creating a webpage, you are in control, and can make sure it fits your brand perfectly.
Let’s create a landing page!
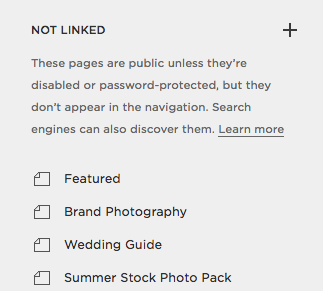
1. Under pages, select the + next to Not Linked
2. Select Page
3. Give the page a new title (we chose Apt B Photography, short and sweet!)

4. Add a Title and Subtitle
Make the heading your Heading 1 Type Face, and Subheading your normal font.
5. Add a Call To Action Button.
a. Click on the black bubble
b. Click on Button
c. Add a Clickthrough URL (See step 5.2 below)
6. Now you are ready for the fun part: Adding content!
a. Click on the black bubble, and under Gallery click Grid
7. Adjust the grid to fit your layout.
For my site, we made it a 1:1 Square Ratio, Selected Crop Images, and Chose 3 thumbnails per row, to mimic my Instagram feed. If you want a title under the image, make sure to check “Show Title” (You will see what this looks like in step 8)
8: To Add Content:
a. Click Edit
b. Upload the image you want to use. We are starting with one of the books Wendy is reading, Little Fires Everywhere.
c. Once the image is uploaded, hover over over the image, and click on the pinwheel
d. Add your Title (make sure this is clicked in the gallery settings. Go back to Step 7 to see how to enable this feature)
e. Add a Clickthrough URL. This is very important! Without this, they are just images in a gallery. With this, they click to whatever link you enter. This can link to the blog post, or an external website.
f. Hit Apply
9. Repeat Step 8 Until all of your content is up! It should look something like this:
desktop Browser
MObile
A FEW FINAL Tips:
To move the images in the gallery around, scroll over the gallery and click edit. This will pull up all the images. From there you can click and drag into the correct order. Keep in mind: New content will automatically be pushed to the bottom. Make sure to drag the content up to the first slot to keep it in order!
Keep the title short. Too long of a title will get cut off.
Are you looking for a Virtual Assistant to help you out, or even create your Instagram landing page? Check out Ava And The Bee!
@apt. b photography, ALL RIGHTS RESERVED
social media
FIND YOUR WAY Around
HOME
about
ELOPEMENTS
COUPLES
Blog
CONTACT
on instagram
Let’s be Insta-friends!
@aptbphoto
FAMILIES
on instagram
Let’s be Insta-friends!
@aptbphoto
Info
Serving St. Pete, FL +
SAvannah, GA


